这篇文章上次修改于 532 天前,可能其部分内容已经发生变化,如有疑问可询问作者。
为什么要编译
一开始是为了体验 QUIC, 在 2023/5/23 更新的 1.25 版本后, 主线分支实验性支持 HTTP/3 就不需要这样做了(谁没事看这玩意官网
编译的好处主要是可以添加一些模块而且版本同步源码的, 可能会比软件包的更新点. (更新的时候也更麻烦点就是了
这里我准备好了一份 Dockerfile, 需要自取. https://github.com/albaz64/nginx-docker
后续添加了一份现成的:docker pull albaz64/nginx:1.25.4
准备编译环境
编译需要用到一些相关的模块依赖, 可以先安装一部分, 剩余的待会检查报错再一个个安.
这里先列出我安装的一部分软件.
cmake
gd
geoip
go
libmaxminddb
libxslt
luajit
安装完成之后开始拉取代码吧!
PS: 本体源码直接从 官网主线分支 拉就行.
编译参数和一些模块这里我参考了 ZoeyVid/nginx-quic
我的系统是 EndeavourOS, 属于 ArchLinux 桌面发行版. 很幸运地没有缺胳膊少腿, 在 Debian 服务器上就很悲剧了, 对着这篇文章一个一个补全的: Linux Nginx安装以及可能出现错误.
编译环境和运行环境是两码事, 如果是给编译给本机的忽略这条
克隆模块
不管是官方文档还是一些几年前的博客用的方法都是一样的, 但是现在我找到了更简单的方法.
直接去拉一个第三方的支持 QUIC 的 OpenSSL 分支指定为 openssl 路径就行.
git clone --recursive https://github.com/quictls/openssl.git --branch openssl-3.1.4+quic然后是一些年久失修的第三方模块. 如果不知道模块是干什么的不用也行.
其中 lua 和 ModSecurity 有自己的依赖需要额外安装一些东西, 当然对于一般的发行版也就是一行命令的事.
git clone --recursive https://github.com/google/ngx_brotli && \
git clone --recursive https://github.com/leev/ngx_http_geoip2_module && \
git clone --recursive https://github.com/openresty/headers-more-nginx-module && \
git clone --recursive https://github.com/aperezdc/ngx-fancyindex && \
# git clone --recursive https://github.com/SpiderLabs/ModSecurity-nginx && \
git clone --recursive https://github.com/arut/nginx-rtmp-module && \
git clone --recursive https://github.com/vision5/ngx_devel_kit && \
# git clone --recursive https://github.com/openresty/lua-nginx-module && \
git clone --recursive https://github.com/nginx/njs
编译
我们可以先从软件源里安装一次再卸载, 目的是看看默认的编译参数有什么. 至少我们编译的模块不应该比这个少. 安装后执行 nginx -V 并复制全部输出. 其中 opt 参数是针对当前系统优化用的, 推荐保留. 当然去掉也没事, 很多自编译版本都是没有这些参数的.
这里是我的编译命令, 其中相关路径可能需要调整. 参数解释可以看 官方文档.
./configure \
--prefix=/etc/nginx \
--user=http --group=http \
--build=CODA --builddir=build \
--with-threads --with-file-aio \
--with-http_ssl_module --with-http_v2_module --with-http_v3_module \
--with-http_realip_module --with-http_addition_module --with-http_xslt_module --with-http_image_filter_module \
--with-http_geoip_module --with-http_sub_module --with-http_dav_module --with-http_mp4_module --with-http_gunzip_module --with-http_gzip_static_module --with-http_auth_request_module --with-http_secure_link_module --with-http_degradation_module --with-http_slice_module --with-http_stub_status_module \
--with-http_perl_module \
--http-client-body-temp-path=temp/client_body_temp --http-proxy-temp-path=temp/proxy_temp --http-fastcgi-temp-path=temp/fastcgi_temp --http-uwsgi-temp-path=temp/uwsgi_temp --http-scgi-temp-path=temp/scgi_temp \
--with-mail --with-mail_ssl_module \
--with-stream --with-stream_ssl_module --with-stream_realip_module --with-stream_geoip_module --with-stream_ssl_preread_module \
--add-module=src/module/nginx-rtmp-module \
--add-module=src/module/njs/nginx \
--add-module=src/module/ngx_http_geoip2_module \
--add-module=src/module/ngx-fancyindex \
--add-module=src/module/ngx_devel_kit \
--add-module=src/module/ngx_brotli \
--add-module=src/module/ModSecurity-nginx \
--add-module=src/module/lua-nginx-module \
--add-module=src/module/headers-more-nginx-module \
--with-cc-opt='-march=x86-64 -O2 -pipe -fomit-frame-pointer -fno-plt -fexceptions -D_FORTIFY_src=2 -fstack-clash-protection -fcf-protection -Wformat -Werror=format-security -DNGX_QUIC_DEBUG_PACKETS -DNGX_QUIC_DEBUG_CRYPTO' \
--with-ld-opt='-Wl,--as-needed,-z,relro,-z,now -flto=auto' \
--with-pcre --with-pcre-jit \
--with-libatomic \
--with-openssl=../openssl \
--with-debug
特别的, 编译器参数 比较复杂, 但编译参数是用于优化的, 非必须. 核心参数是 -O2 -pipe, 其他的更多是关于安全方面的.
确认无误后执行
sudo make -j5
sudo make install
# 测试一下
nginx -V
可以选择将二进制文件安装到 /usr/bin 目录下或者通过 sudo ln -sf /etc/nginx/sbin/nginx /usr/sbin/nginx 链接过去.
更推荐使用链接的方式, 因为再次编译会在原来位置产生一个 nginx.old 文件用于回滚备份.
再次编译报错解决
首先要搞清楚到底是系统依赖问题还是缓存构建的问题.
系统问题是指系统上的依赖库版本太低, 需要手动安装或者引入非系统的依赖路径
缓存问题是指上一次编译正常, 这一次就算相同参数也报错. 这是由上一次编译残留的缓存引起的, 并且系统环境发生了一些变化.
直接全删重新拉一遍一般就能解决.
创建守护进程
可以参考官方文档给出的 示例
sudo vim /etc/systemd/system/nginx.service
[Unit]
Description=The NGINX HTTP and reverse proxy server
After=network-online.target remote-fs.target
Wants=network-online.target
[Service]
Type=forking
PIDFile=/etc/nginx/logs/nginx.pid
ExecStartPre=/usr/sbin/nginx -t
ExecStart=/usr/sbin/nginx
ExecReload=/usr/sbin/nginx -s reload
ExecStop=/usr/sbin/nginx -s stop
PrivateTmp=true
[Install]
WantedBy=multi-user.target
重载并添加
sudo systemctl daemon-reload
sudo systemctl enable --now nginx.service
# 看看服务器在不在运行
curl -Il 127.0.0.1
测试配置
简单配置一下上面添加的 br 模块, 其他模块需要看对应文档.
user http http;
worker_processes 1;

http {
    include mime.types;
    default_type application/octet-stream;
    charset UTF-8;
    log_format quic '$remote_addr - $remote_user [$time_local] '
    '"$request" $status $body_bytes_sent '
    '"$http_referer" "$http_user_agent" "$http3"';
    access_log logs/access.log quic;
    sendfile on;
    keepalive_timeout 65;

    # gzip 压缩
    gzip on;

    # br 压缩
    brotli on;
    brotli_comp_level 6; # 0~11, default 6
    brotli_static always;
    brotli_buffers 32 4k;
    brotli_min_length 20;
    brotli_types *;
    brotli_window 128k;

    # SSL 共用配置
    ssl_certificate cert/kazusa.cc+1.fullchain.crt;
    ssl_certificate_key cert/kazusa.cc+1.key;

    ssl_session_cache shared:SSL:10m;
    ssl_session_timeout 5m;
    ssl_protocols SSLv2 SSLv3 TLSv1.1 TLSv1.2 TLSv1.3;
    ssl_ciphers ALL:!ADH:!EXPORT56:RC4+RSA:+HIGH:+MEDIUM:+LOW:+SSLv2:+EXP:!aNULL:!MD5;
    ssl_prefer_server_ciphers on;
    add_header Strict-Transport-Security "max-age=31536000";

    http2 on;

    # QUIC
    http3 on;
    # http3_hq on;
    # quic_retry on;
    # ssl_early_data on;
    add_header Alt-Svc 'quic=":443";ma=2592000;h3=":443"; ma=2592000,h3-29=":443"; ma=2592000';
    add_header Brotli-Ratio $brotli_ratio;

    server {
        listen 443 quic reuseport;
        listen 443 ssl;
        server_name server.kazusa.cc;
        ......
}
sudo nginx -s reload
测试
浏览器访问测试显然是非常不靠谱的, 这里我们选择强大的 curl 工具. 但 curl 默认是不支持 HTTP3 的, 我们需要像上面一样编译一个才行. 但这样实在是太麻烦了而且没什么实际用处. 所以我们直接从 docker 拉一个过来就好!
更新:现版本已经并入可以直接用系统自带的了。
有输出就是支持的:curl --version | grep HTTP3
docker pull zoeyvid/curl-quic
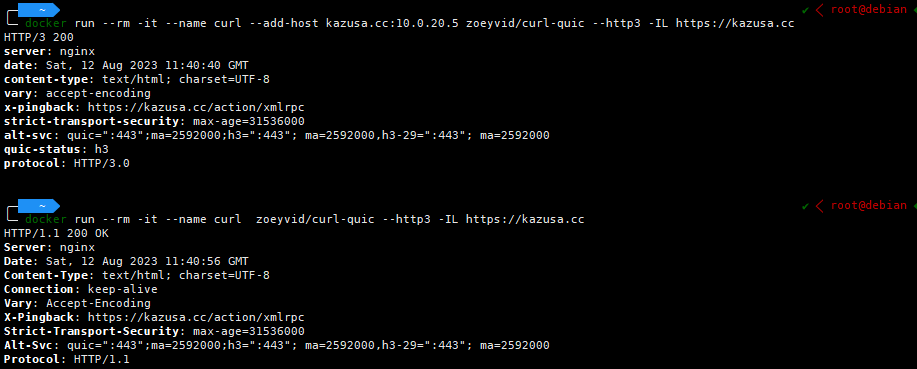
docker 指定 IP 和域名传入, 再去请求这个域名解决. 或者换台设备用 WSL 去请求docker run --rm -it --name curl --add-host router.kazusa.cc:10.0.0.1 zoeyvid/curl-quic --http3 -IL https://router.kazusa.cc
可以看到这次我们成功了, 好耶!
更新: 由于内网环境的 nginx 莫名其妙在最近一次系统更新时坏掉了, 所以又编译了一次, 轻车熟路.
同时也发现了服务器环境走 HTTP/1.1 的真相:

经过公网转一圈回来就是下面这样, 知道了原因又怎样, 这个实在是无能为力.
已有 2 条评论
不错不错ヾ(≧∇≦*)ゝ
@威言威语 内网环境比服务器好玩多了, 至少 git 和 docker pull 命令我还能自己解决, 公网真的无能为力. 用 FTP 才把代码拷过去的.